🔄 Move Your Store Content — Store to Store
ZS StoreSync makes it easy to transfer your Shopify store data from one store to another. Copy products, collections, pages, customers, orders, blogs, and more—all directly between Shopify stores, with no spreadsheets, CSV exports, or developer assistance required.
This documentation guides you through every feature of the app, from connecting your stores to completing your first migration. Whether you're moving to a new store, creating a backup, or syncing data between multiple stores, you'll be up and running in just a few minutes. 🚀
📖 Overview
ZS StoreSync lets you securely transfer data between two Shopify stores you own:
🔹 Source Store – The store you copy data from.
🎯 Destination Store – The store you copy data to.
To get started, simply install ZS StoreSync on your destination store, then connect your source store using its unique connection code. Once connected, choose the data you want to transfer and start the migration.
All data is transferred directly between your Shopify stores using Shopify's official APIs, ensuring a secure, reliable, and efficient migration—without CSV files, manual imports, or third-party tools. 🔒
🔄 Store to Store
Copy content directly between two Shopify stores you own—quickly, securely, and without manual exports.
🔒 Nothing Stored
Your data is transferred directly between your stores using Shopify's APIs. ZS StoreSync never stores your data on its servers.
✅ Duplicates Skipped
Existing items are automatically detected and skipped, helping you avoid duplicate content during migration.
🛡️ Code-Protected Connection
Your source store can only be connected using its unique private connection code, ensuring that only authorized stores can access the migration.
⚙️ How It Works
ZS StoreSync is a true store-to-store migration tool. Your data is transferred directly between your Shopify stores—there are no CSV imports, no manual exports, and no copies of your data stored on third-party servers.
Here's how the process works:
- 🔗 Connect Your Source Store
On your destination store, enter the source store's domain and private connection code to securely authorize the connection. - 📦 Choose What to Transfer
Select the data you want to migrate, including products, collections, pages, files, customers, orders, blogs, and more. - ⚡ Transfer in Real Time
StoreSync transfers data directly between your stores using Shopify's Admin API. Track progress in the live log. - ✅ Automatic Duplicate Detection
Before creating new records, StoreSync checks your destination store for existing items matching them by SKU first, then handle to prevent duplicates.
🏁 Getting Started
Before you begin, make sure you have two Shopify stores you own:
🔹 Destination Store – The store you want to copy content to.
🔹 Source Store – The store you want to copy content from.
Follow these simple steps to start your first migration:
- 🏪Install StoreSync on your destination store — the store you want to fill with content.
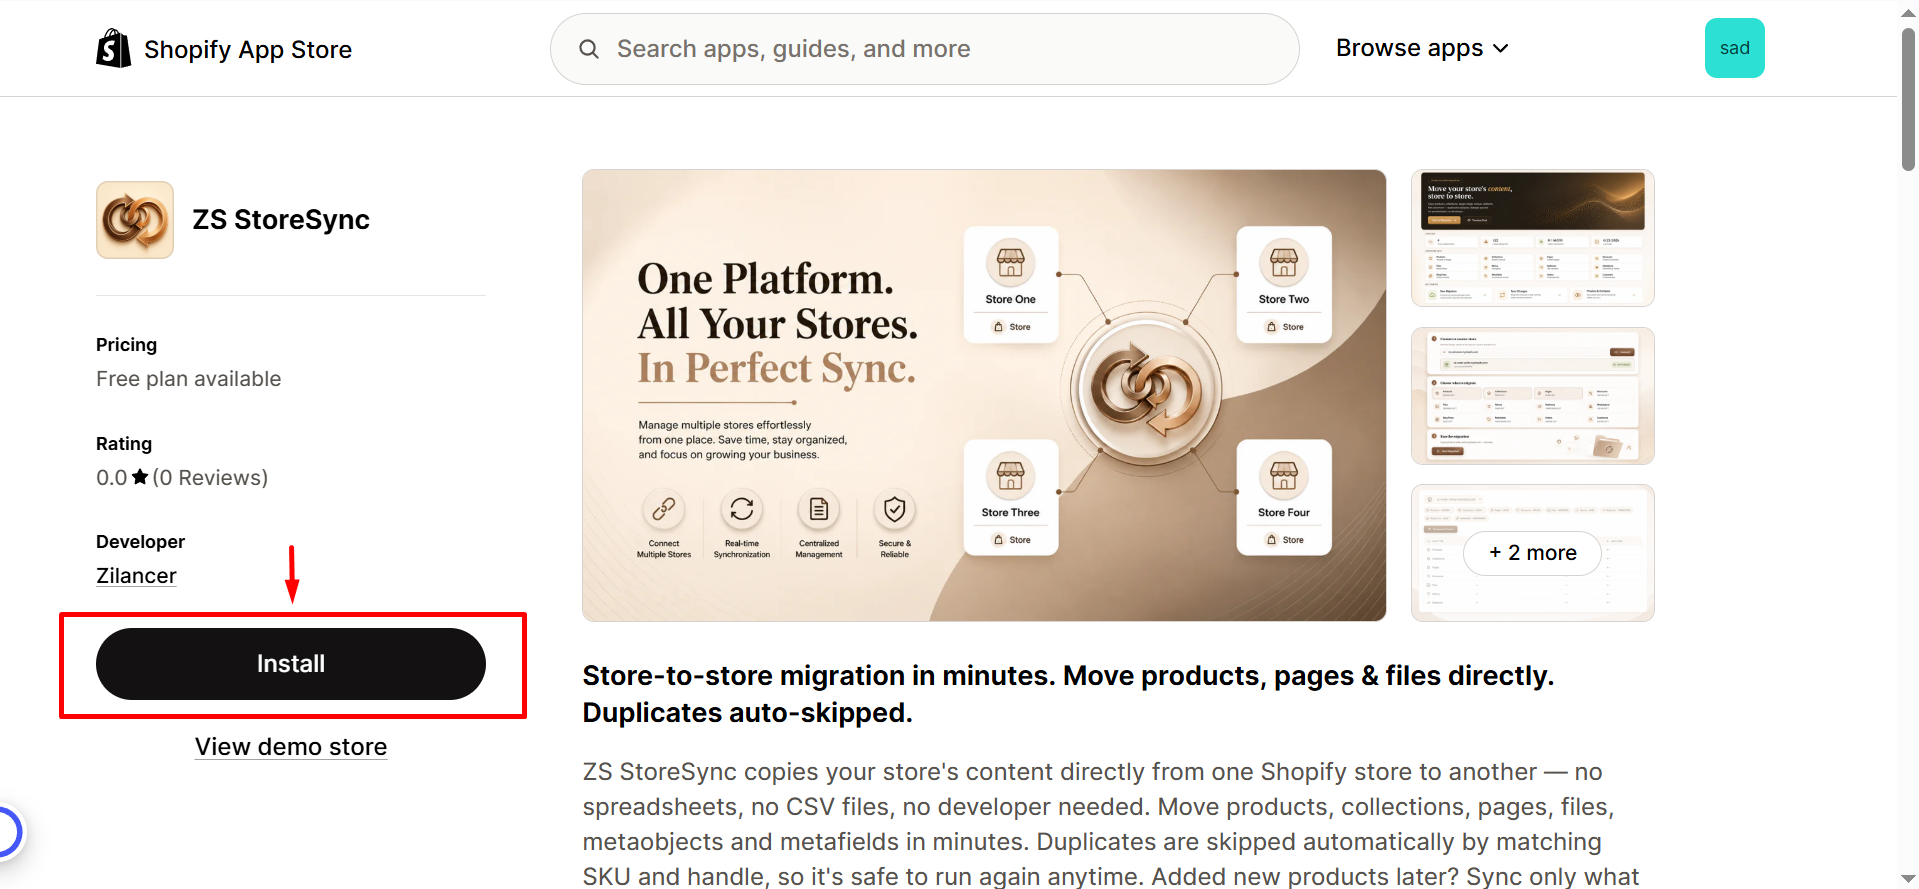
- 🔗 Install StoreSync on your source store too, so it can be securely connected.
.
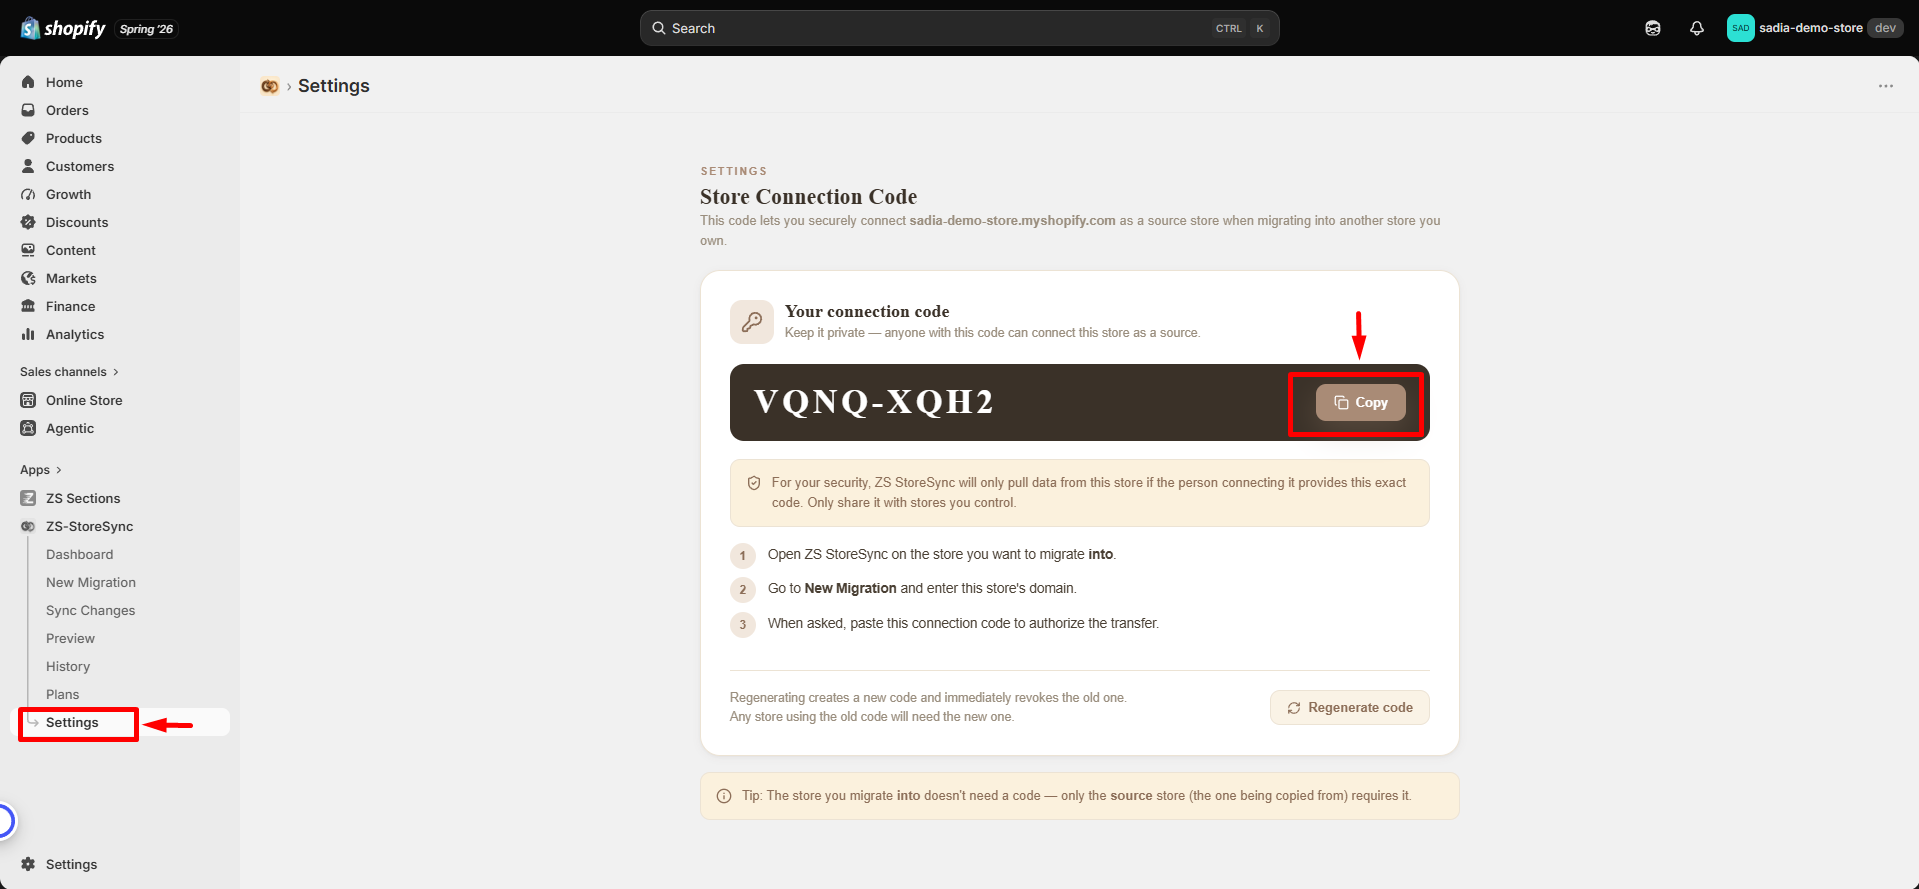
- ⚙️ On the source store, open Settings and copy its connection code (see Connection Code).
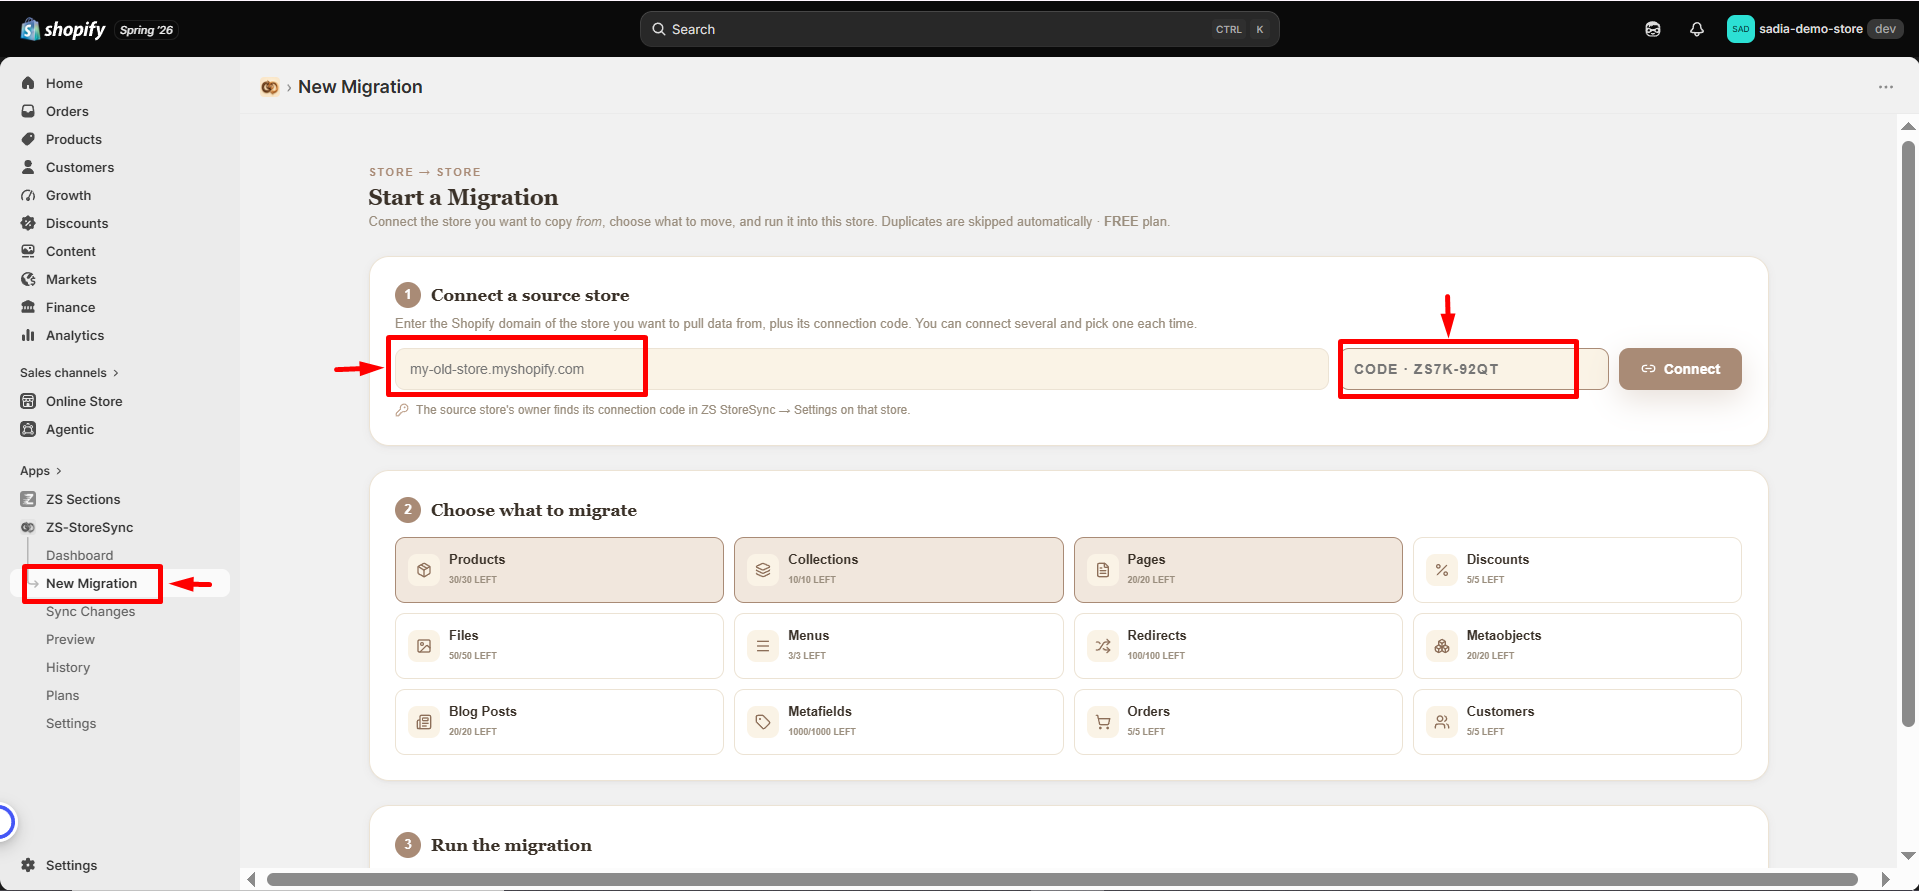
- 🚀 On the destination store, go to New Migration, enter the source domain and paste the code, then connect.
.
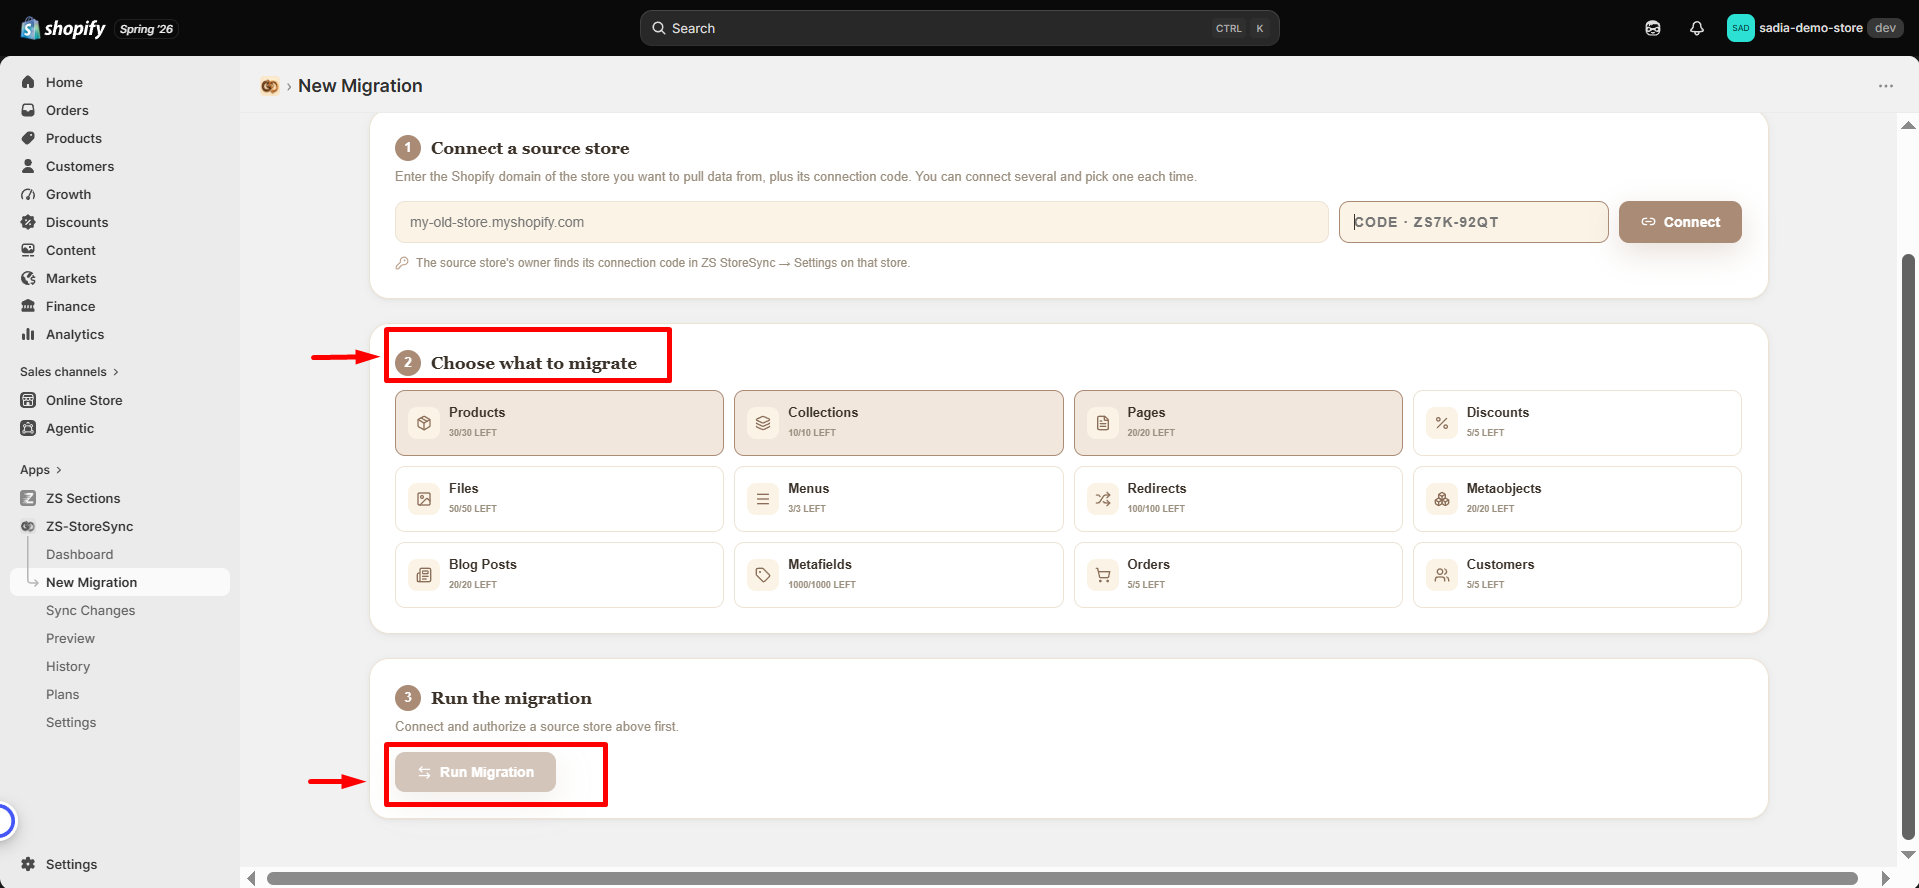
- 📦 Choose what to migrate and run it. Watch the live log and review the summary when it finishes.
.
🔑 Connection Code
Every Shopify store has a unique Connection Code that protects your store and ensures only authorized users can access its data.
When connecting a source store, ZS StoreSync requires both the store domain and the Connection Code. Since the code is only available to users with admin access to the source store's StoreSync Settings, unauthorized users cannot connect your store without permission.
📍 Finding Your Connection Code
Follow these steps to find your code:
- Open StoreSync on the store you want to use as a source.
- Go to Settings from the left menu.
- Copy the display code (
XXXX-XXXXformat) and share it with the destination store.
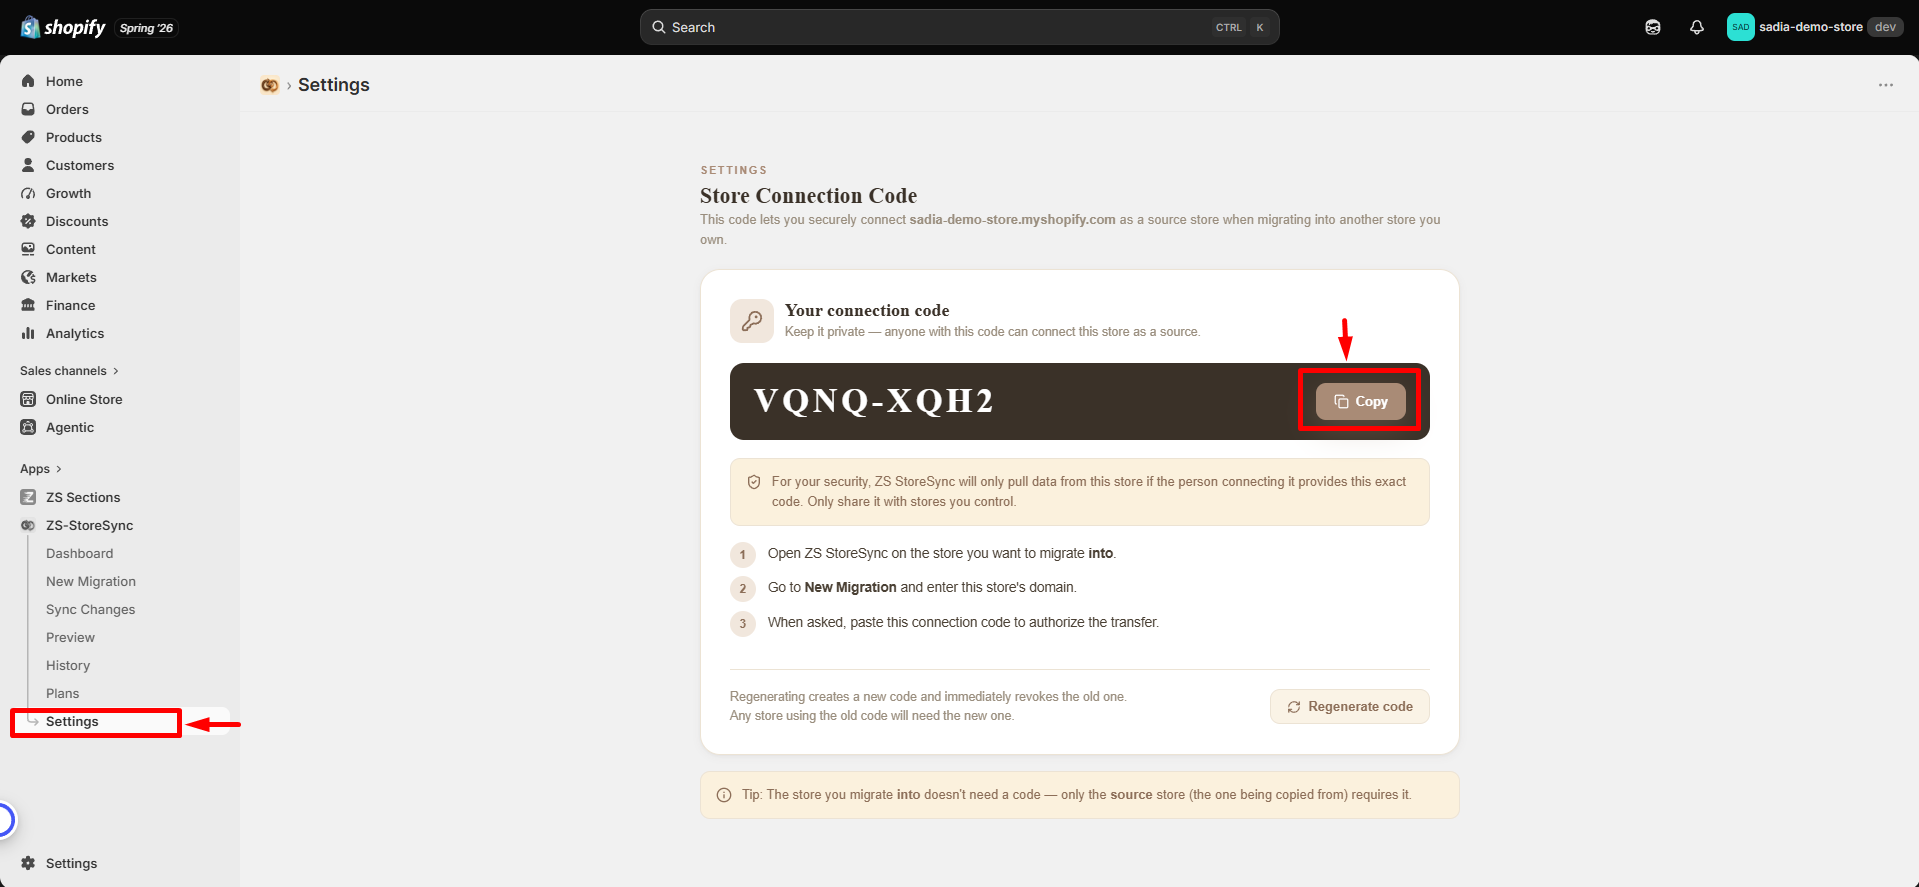
Anyone with your Connection Code can connect your store as a source and copy its content.
Only share your code with stores you own or trusted team members. You can generate a new code anytime from Settings to disable the previous one and secure your store. 🔒
🚀 New Migration
This is where every transfer begins. The migration process has three simple steps:
1. 🔗 Connect a Source Store
2. 📦 Choose What to Migrate
3. ⚡ Run the Migration
🔗 Step 1 — Connect a Source Store
Enter the source store domain (for example: my-old-store.myshopify.com) and its Connection Code, then click Connect.
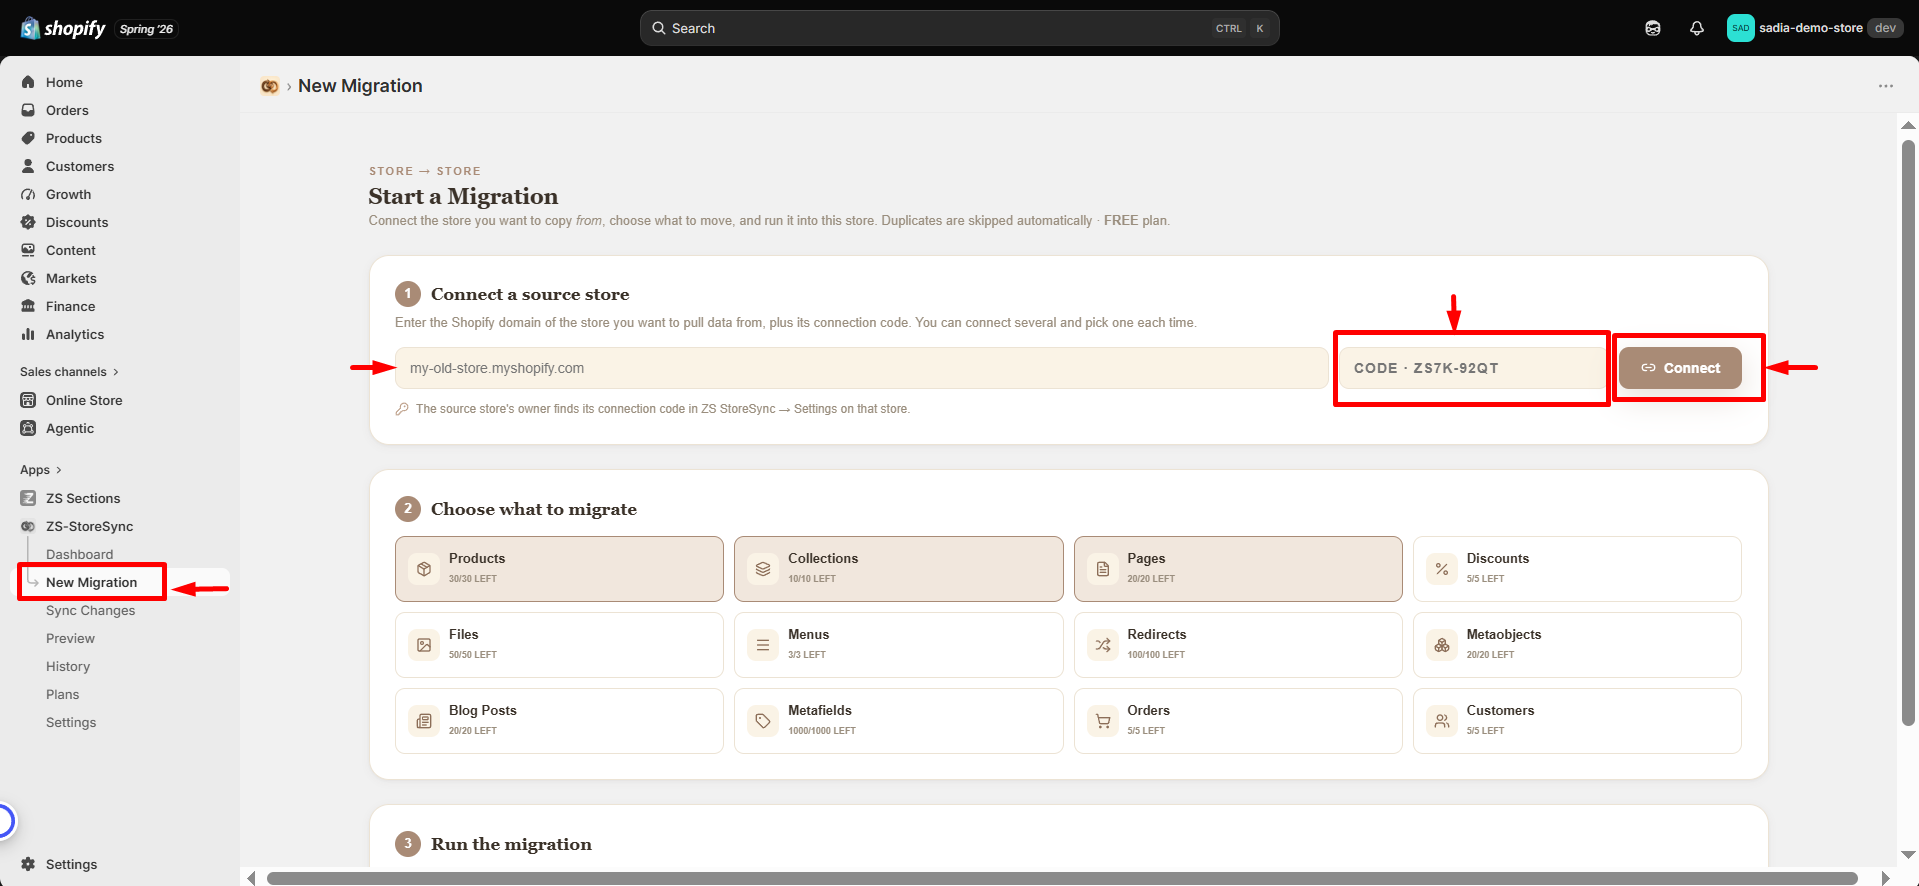
A new tab will open asking you to authorize ZS StoreSync on the source store. After approval, return to the app and click I've Authorized. The store will then appear with an Authorized badge.
📦 Step 2 — Choose What to Migrate
Select the data types you want to transfer. Each option shows your remaining monthly quota based on your current plan.
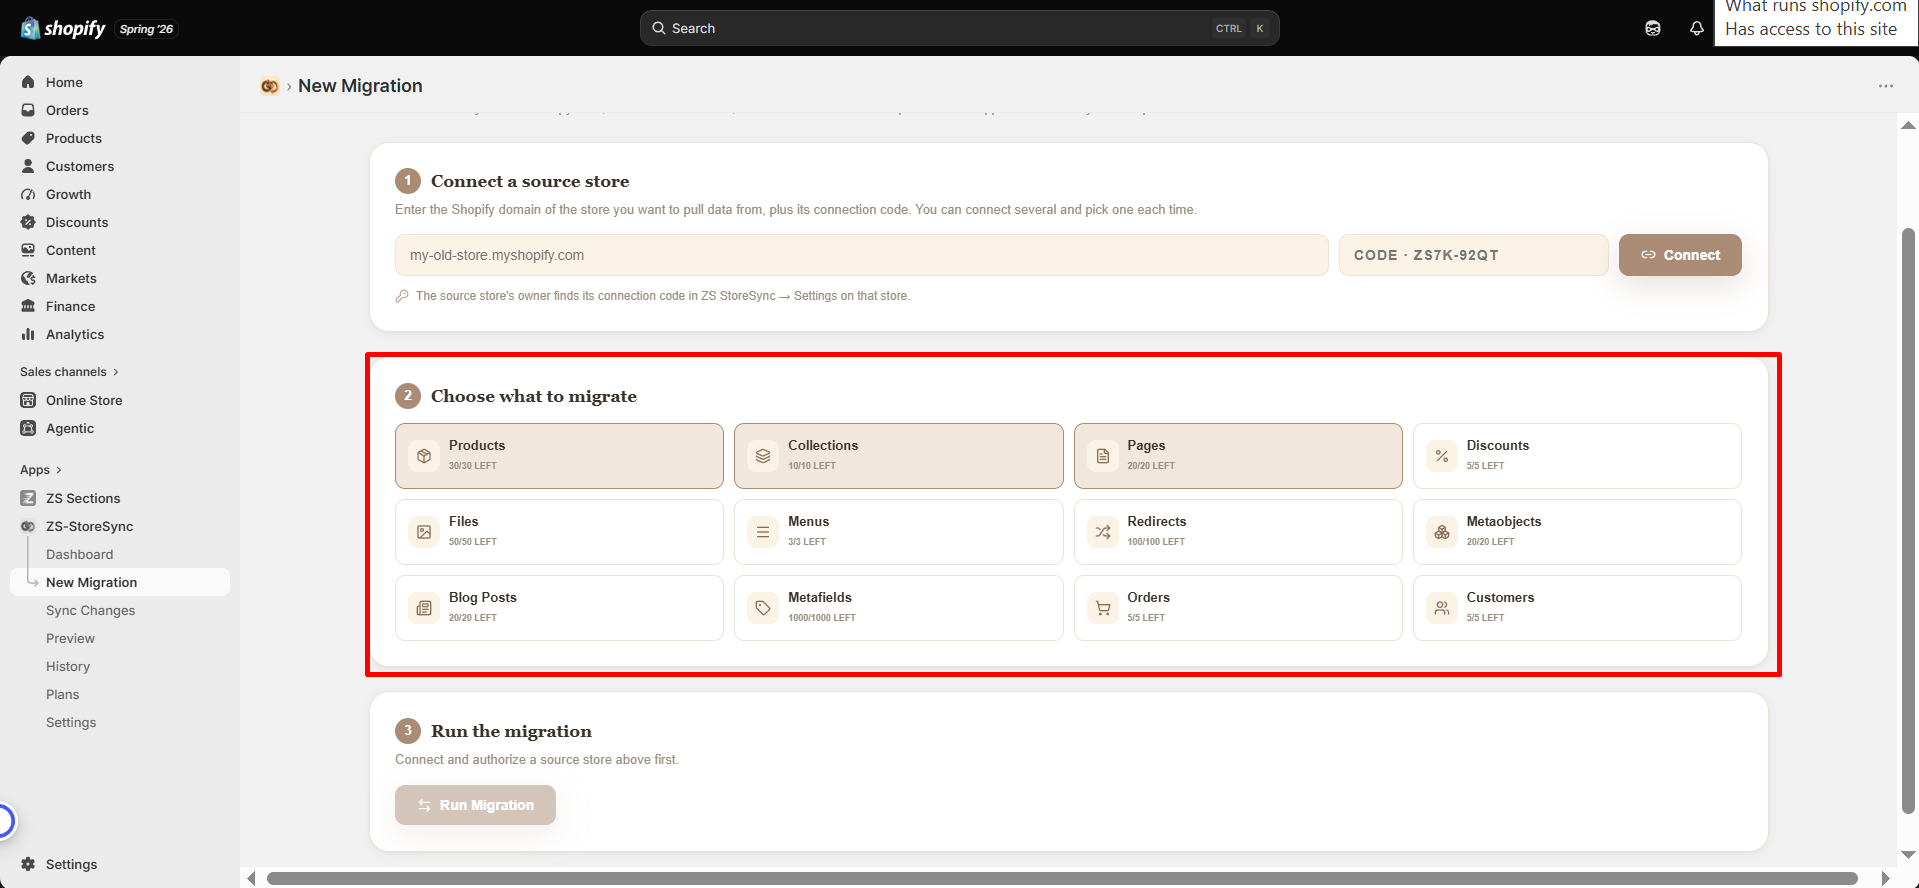
Features not available on your plan will appear locked with an Upgrade option.
⚡ Step 3 — Run the Migration
Click Run Migration and keep the tab open while the process runs.
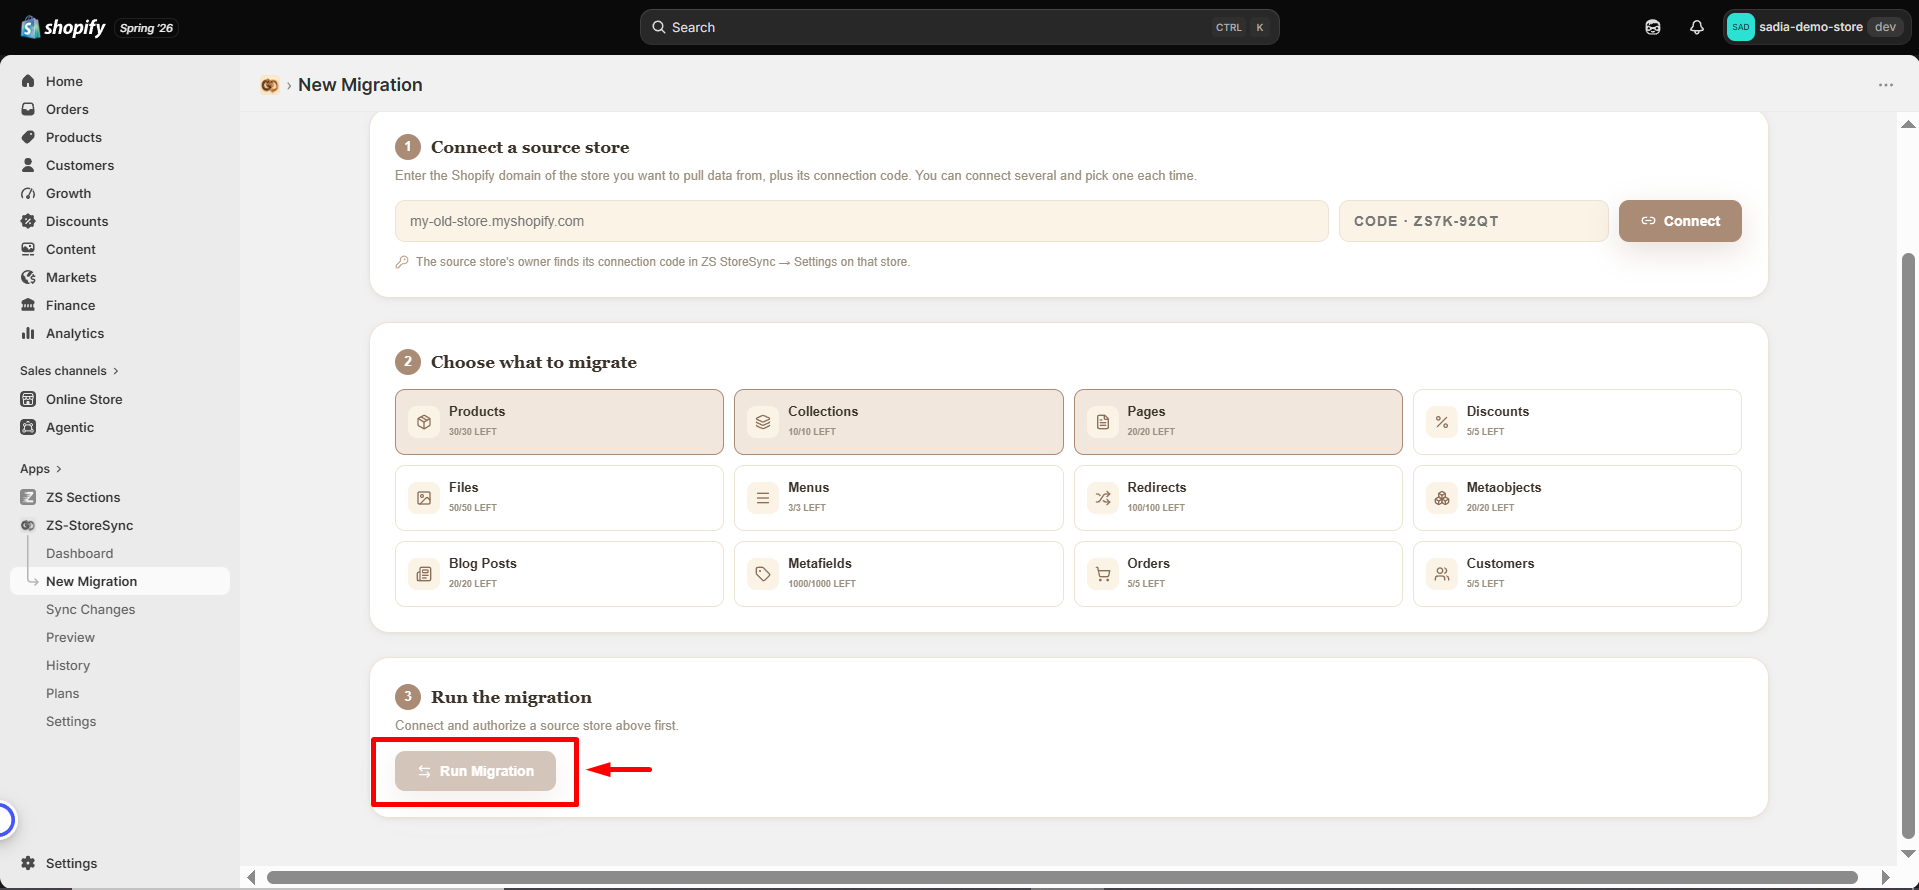
The live log shows each item as it transfers. Once completed, you'll see a detailed migration summary.
🔌 Disconnect a Store
When you no longer need a connected source store, you can remove it from your StoreSync connection list.
Follow these steps:
- On the New Migration page, find the store in your connected list.
- Click the trash icon next to it.
- Confirm by clicking Yes, Remove.
Disconnecting fully revokes StoreSync's access to that source store and removes it from your list. To connect it again later, you'll need to re-enter its connection code and re-authorize — the same secure flow as the first time.
🔄 Sync Changes
Already migrated your store once? Sync Changes helps you transfer only the new updates instead of running a full migration again.
Use Sync when your source store has added new products or content after the initial migration. ZS StoreSync compares both stores and transfers only items that are missing from the destination store.
Items are matched by SKU and handle to prevent duplicates and help you save your migration quota by avoiding unnecessary transfers. ✅
👀 Preview & Compare
Preview your migration before transferring any data. It performs a safe dry run that doesn't make any changes to your stores.
ZS StoreSync compares your source and destination stores side by side, showing the item count for each selected data type. This helps you verify that you've connected the correct store and review the migration details before starting.
Since Preview is read-only, no items are created, updated, or modified during the process. ✅
🕒 History
Keep track of every migration and sync activity in one place.
Each history entry includes the source store, destination store, transferred data types, date, and migration results. Open any entry to view the complete live log and review the details of a previous transfer.
History makes it easy to confirm completed migrations or troubleshoot issues when a transfer doesn't go as expected.
📦 What You Can Move
ZS StoreSync supports a wide range of Shopify content types, making it easy to transfer your store data between stores.
Available content types and monthly migration limits depend on your current plan. Check your plan details to see which features are available.
🔁 Duplicate Handling
ZS StoreSync prevents duplicate content by checking existing items before creating anything new.
Before transferring data, StoreSync looks for matches in the destination store—first by SKU, then by handle. If a matching item is found, it is automatically skipped and included in the migration summary.
This allows you to run migrations again whenever needed safely. Only new items are added, while your existing content remains unchanged.
📊 Plans & Billing
Each plan includes a monthly migration quota for each data type. You can upgrade, downgrade, or cancel anytime—all payments are securely processed through Shopify.
| Plan | Price | Best for |
|---|---|---|
| Free | $0 | Trying it out — core types with a small monthly quota. |
| Starter | $12.99/mo | Active store moves, with files, discounts & menus. |
| Growth | $24.99/mo | Larger catalogs — higher limits across every type. |
| Pro | $39.99/mo | Big migrations and ongoing syncs at maximum limits. |
🗓️ Annual Billing
Annual billing is available for all paid plans at a discounted rate.
To choose a plan:
1️⃣ Open Plans in the app.
2️⃣ Select Monthly or Annual billing.
3️⃣ Choose your preferred plan.
4️⃣ Complete the payment through Shopify's secure checkout.
Your updated limits will be available immediately after approval.
🔐 Settings
The Settings page is where each store manages its Connection Code.
From here, you can view and copy your store's current code or generate a new one when needed. Regenerating the code will immediately invalidate the old code, and any connected destination store will need the new code to reconnect.
Visit this page on your source store whenever you need to get or update the Connection Code before starting a migration.